Image Stitching
Next Article >>
Stitching:
"Stitching" is the term used to refer to taking, as input,
a series of digital photos and producing, as output, a final panorama.
It is one of the quickest ways to start creating high quality panoramas.
TIP: Many digital camera's sold today come with a CD full of software
for your camera, including panorama stitching software. Also, more and more
digital cameras have a 'photo stitch assist' mode, which helps you to take
pictures with the correct amount of overlap. So before you go looking for third party
solutions, you may already have photo stitching software and not even know it.
Some digital cameras even have panorama stitch capabilities built directly into
the camera.
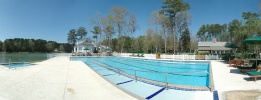
The Goal: The entire goal of the stitching process is to produce a high
quality, high resolution panorama. This panorama is your 'proof' copy
which you always keep. You can then resize the proof copy down to a
resolution appropriate for (1) the Internet, (2) advertising,
(3) kiosks, (4) brochures, or whatever your final use. The
point is that after going through all of the effort to produce a
panorama, you don't just produce a limited resolution panorama that you
need now, but rather a 'proof' version that can also be used later.
For example, when the Internet was mostly dialup, most panoramas produced
were small. When Internet connections became high speed connections,
improving the older tour to use a larger panorama means what --
(1) resizing a proof panorama,
or (2) reshooting and stitching a new panorama.
With a 6 MP DSLR camera, you should be able to produce panorama proofs
that are over 15000 x 2700 pixels in size (40 MP).

PhotoVista Panorama JPEG Quality
|
High Quality Proof: Regardless of which image stitching software you
use, after producing a panorama, you need to save it to your hard drive as
a JPEG image. When doing so, you are typically given the option of selecting
a size and quality for the panorama. Select the largest size and highest quality
possible (avoid JPEG jaggies/artifacts). Consider
the original panorama your proof copy.
You will then later resize the pano proof to a smaller size (for the web),
possibly brighten portions of the image, apply sharpening, and finally
save as a high quality JPEG for the web.
For example, when using PhotoVista Panorama and you save your panorama as a
JPEG, you will see the dialog to the right. Notice that the best setting
is not selected by default.
PhotoVista Panorama: I have personally used "PhotoVista Panorama"
with very good results.
AutoStitch:
Several people have recommended a stitcher to me called
AutoStitch.
While I have not yet tried this program, you may want to.
Other Stitchers: As there are so many stitching programs out there, just go
out and try a few and see which one works best for you and your camera. Pay
close attention to the quality of the actual blending of images.
|