Taking Photographs
Next Article >>
Read the Manual:
Most DSLR's have so many settings that can be customized that most
photographers don't understand them all. That is OK for the casual
photographer, but if your goal is to produce outstanding panoramas, you
really owe it to yourself to try to understand photography
more than the casual photographer. Take the time to actually read the owners
manual. Many manuals discuss how and when certain settings should
(and should not) be used.
Here are my recommendations for taking high quality pictures that will
ultimately be stitched into a panorama:
How Many Pictures?: You should plan on having anywhere from 30% to 40%
overlap between pictures. How wide angle your lens is will determine how many
pictures to take to achieve that overlap. But you also want a number of pictures
that divides nicely into 360°. Like 18 pictures at 20°, 12 pictures at 30°,
9 pictures at 40°, 8 pictures at 45°, 6 pictures at 60°, etc.
Tripod Setup: Set up your tripod, using the built-in spirit level to
get a level tripod. Attach pano equipment and camera. Slightly loosen and
tighten pano equipment lock-screws to ensure a solid and square fit between
camera and pano equipment (due to the camera weight). Some people actually
hang a heavy bag from their tripod to weight it down to increase stability.
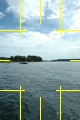
Gridlines
|
Verify a Level Camera: Many high end digital cameras allow for 'grid
lines' to be turned on in the viewfinder. If there is something in your
panorama that you know is level or plumb (surface of a lake, edge of a building, etc)
compare to the grid lines in your viewfinder to verify that your camera is
level.
Camera Orientation: Turn your camera 90° on its side
when taking pictures (from landscape to portrait).
Doing so produces a 360° panorama
where the vertical field of view is maximized. It gives you the
flexibility to keep the wider field of view, or crop later.
Image Quality and Size: Most, if not all, digital cameras allow
you to select not only the image quality (basic, normal, high), but also
the image size (small, medium, large). Since these settings affect how
many pictures will fit onto the memory card in the camera, most
manufacturers default the camera to a 'middle' setting to maximize claims
of how many pictures will fit onto a memory card. However, select the
largest image size and highest image quality available for your camera.
With today's memory cards and hard drive capacities, you should not have
to compromise on size and quality.
JPEG jaggies/artifacts
Sensitivity (ISO Equivalency): Use the lowest ISO setting
appropriate to the scene that you are imaging. In general, the lower
the ISO setting, the 'cleaner' the final photo will be in terms of fewer
'noise' pixels. The higher the ISO, the more 'grainy' the photo will be.
Since your camera is on a tripod, you don't have to worry
about blurring and an ISO of around 100 or 200 will typically work great
and produce quality photos.

Manual: Better
|

Auto: Pinkish?
|
White Balance: The 'automatic' setting works 99% of the time. But
be aware that your camera likely allows you to customize the white
balance setting. Namely, incandescent, fluorescent, sunlight, flash,
cloudy, shade, or a measured reading from an 18% gray board.
In some cases, a measured custom setting from an gray
card will produce a better, more natural looking photo, especially
in mixed lighting environments.
Focal Length: In general, taking pictures with the smallest
focal length (widest angle) works best because that implies fewer
pictures will have to be taking to stitch together a 360°. However, be
aware that at wide angles, some lenses may suffer from
Barrel Distortion
Focus and Aperture: In order to properly stitch multiple images into a single
panorama, you need the focus distance to remain constant. That means you must turn
off auto focus (AF) and manually select a focus distance. Also, for panorama
photography, you rarely want 'out of focus' elements. Rather, you want
everything to be in focus. To select an appropriate focus distance and
aperture for panorama photography, you should use
Hyperfocal Distance. You now have a fixed
aperture and fixed focus distance to use.
Exposure Metering: Your camera is capable of automatically determining
proper exposure, which allows you to simply 'point and shoot', and most of
the time, take a really good picture. But, your camera likely has many
different ways to measure exposure. For example, your camera can determine
exposure based upon the entire scene, a small area in the center of the scene,
and a tiny spot anywhere within the scene.
Or measure exposure from an 18 percent gray card. Place the card in the same
light as your subject and take a reading off the card.
I once had a person write to me explaining that a particular camera mode that
I had recommended was 'taboo' for panoramic photography and provided examples
to illustrate his point. Sadly, the only thing which he clearly demonstrated
is that he had not adjusted, nor understood, exposure at all. Simply switching
from 'whole frame' exposure metering to 'spot' metering solved his problem.
Please understand that your camera is simply a very sophisticated automatic
tool but that YOU are ultimately responsible for proper exposure, not the
camera.
Vibration Reduction OFF: If you lens supports vibration reduction,
read the manual. For Nikon VR, when the camera is mounted on a tripod, Nikon
recommends turning VR OFF, and this is very true. As a test, I kept VR on
when using a tripod, and some of the pictures turned out blurred.
Eliminating Remaining Blur: If tripod shake is causing blurring of photos,
most DSLR's have an 'Exposure delay mode', where pressing the shutter
will cause the mirror to rise immediately, but the photo will be taken
one second later, hopefully after any shake is gone.
Lens Hood: When taking pictures outdoors in direct sunlight,
always try to use a lens hood, or some other method of blocking the sunlight
because you want to prevent glare and lens flare.
Flash: In general, I find that photos taken with a flash look
'harsh' when compared to photos taken using natural light. However,
in certain very low light situations, using 'slow sync' flash mode
can produce photos that look better than no flash. In 'slow sync'
the flash goes off, but the exposure is still a long term exposure.
Namely, meter a shoot assuming no flash and set your camera to those
'no flash' settings -- but then turn the flash on. In a dark room
with poor lighting, this technique can produce good results.
|


